
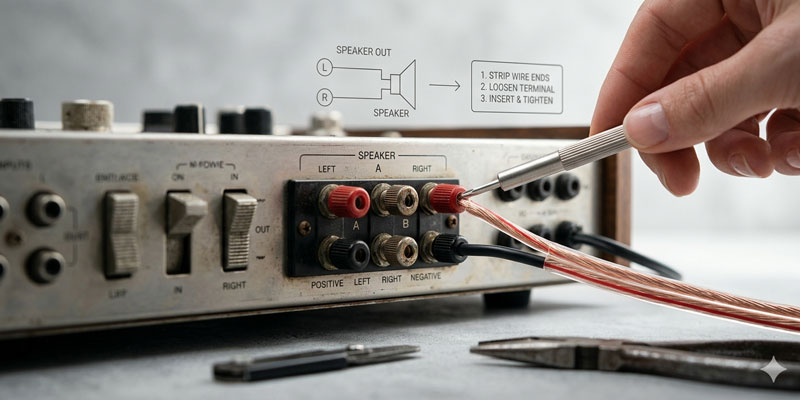
If you have a vintage amplifier that you love, connecting your speaker wire to it might seem tricky at first. But don’t worry—you can get it right with a few simple steps.
Knowing how to connect speaker wire to your vintage amp not only ensures the best sound quality but also protects your equipment from damage. In this guide, you’ll learn exactly how to match your wires to the right terminals, keep your connections secure, and avoid common mistakes that could spoil your listening experience.
Ready to bring your classic sound system to life? Let’s dive in and make sure your vintage amp and speakers work perfectly together.
Prepare Your Equipment
Preparing your equipment is the first step to connecting speaker wire to a vintage amp. This phase ensures safety and clarity during the process. It helps avoid damage to your audio gear and guarantees the best sound quality.
Taking time to prepare makes the wiring task smooth and efficient. Focus on gathering the right tools, checking wire polarity, and securing power off. These simple actions set the stage for a successful connection.
Gather Tools And Materials
Collect all necessary tools and materials before starting. You will need speaker wire, wire strippers, a screwdriver, and electrical tape. Having everything ready prevents delays and frustration.
Check that your speaker wire is suitable for vintage amps. Use wires with proper thickness and good insulation. Keep your workspace clean and well-lit for easy handling.
Identify Wire Polarity
Knowing the wire polarity is crucial for correct connection. Speaker wires usually have markings to show positive and negative sides. One wire may have a stripe or be a different color.
Match the positive terminal on the amp with the positive wire. Do the same for the negative side. Correct polarity avoids sound distortion and protects your equipment.
Turn Off And Unplug Devices
Always turn off and unplug the amp and speakers before working. This prevents electric shock and damage to the components. Never connect or disconnect wires while devices are powered on.
Wait a few minutes after unplugging to ensure all power has drained. Safety first. This step protects you and your vintage amplifier from harm.
Attach Speaker Wire To Amp Terminals
Attaching speaker wire to the amp terminals is an essential step in connecting your vintage amplifier to speakers. Proper connection ensures clear sound and prevents damage. Follow these simple steps to connect wires safely and correctly.
Strip Wire Ends
Start by removing the outer insulation from the speaker wire. Use a wire stripper or a sharp knife. Strip about half an inch of insulation to expose the copper wire. Be careful not to cut the wire strands inside. Twisting the strands together helps prevent fraying.
Connect Positive And Negative Wires
Identify the positive (+) and negative (-) wires. Most speaker wires have markings or colors to help. Connect the positive wire to the amp’s positive terminal. Attach the negative wire to the negative terminal. Correct polarity keeps sound balanced and clear.
Secure Wires To Binding Posts
Loosen the binding posts on your vintage amp. Insert the stripped wire ends into the holes or wrap them around the posts. Tighten the posts firmly to hold the wires in place. Ensure no stray strands touch other terminals to avoid short circuits.
Test And Troubleshoot Connections
Testing and troubleshooting speaker wire connections on a vintage amplifier ensures your sound system works perfectly. It helps catch issues early and keeps your audio clear. This step is crucial after making all connections.
Power On And Play Audio
Start by turning on your vintage amp. Make sure the power switch clicks and the indicator light turns on. Select a source, like a CD player or phone, connected to the amp. Play some audio to test the signal.
Check For Proper Sound Output
Listen carefully to the speakers. Sound should be clear and without distortion. Check both left and right channels to confirm balanced output. If one speaker is silent, check connections again. Adjust volume slowly to avoid damage.
Fix Common Connection Issues
Loose wires cause no sound or poor sound. Tighten all terminal screws on the amp and speakers. Ensure the positive wire connects to the positive terminal and the negative to the negative. Swap speaker wires to test if a wire is faulty. Replace damaged wires if needed.
FAQs: How to Connect Speaker Wire to Vintage Amp?
How To Connect Speaker Wires To An Amp?
Turn off and unplug the amp. Strip speaker wire ends. Connect the positive wire to the amp’s positive terminal, and the negative to the negative. Secure wires tightly. Ensure matching polarity on both amp and speaker for clear sound.
Can I Use Speaker Wire Instead of RCA?
You cannot directly use speaker wire instead of RCA cables. Use a Line Output Converter or adapter to convert speaker-level signals to RCA line-level. This prevents audio issues and protects your equipment from damage. Always match positive and negative connections for proper sound quality.
How To Connect Speaker Wire To Wire?
Strip about half an inch of insulation from each speaker wire end. Twist the exposed strands tightly. Align positive wires together and negative wires together. Twist each pair securely or use wire connectors. Ensure no strands touch opposite polarity. This creates a solid, safe connection for clear sound.
Conclusion
Connecting speaker wire to your vintage amp is simple and rewarding. Always match positive and negative terminals carefully. Secure connections prevent sound problems and protect your equipment. Take your time to check each step for safety. Enjoy clear, rich audio from your vintage setup.
This basic skill keeps your music playing beautifully for years.